Here are step by step instructions on how we cut bottles. There are many ways to cut bottles and I have tried quiet a few of them. This is what I think is the easiest way and I have had the most success with. Thanks for checking out my blog and good luck!
1. Getting the labels off
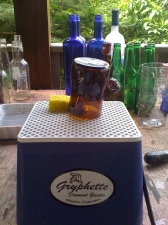
You think this would be the easy part but sometimes getting the glue off takes the most time. I soak the bottles in warm water with dish detergent. The longer they soak the easier the labels come off. Then I use a knife to scrape as much as I can. I have a wire brush that I use now to brush more of the label and the glue off. The label should be mostly off by now and I use Goof Off to wipe the bottle clean.
2. Cutting the bottles
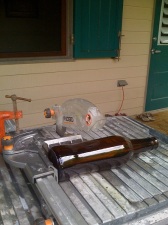
This step actually takes the least amount of time but believe me you will get frustrated until you master it. Don’t give up but always remember slower is better when it comes to cutting glass or you will make a lot of mistakes. We use a 7″ rigid tile saw. We did buy a special blade for just cutting glass. It was around $50. We set the guard to the length that we want the bottle cut and slowly turn the bottle until it is etched completely around. You are limited with a 7″ tile saw. I wanted to try to cut a bottle length wise but you need a bigger saw to do that. We now turn the bottle slowly until it is cut all the way through. My husband likes to push it through after he goes around the bottle as the video will show. This technique does not work as well for me so just test it out to see what you feel comfortable with.
3. Grinding the inside edges
We bought a stain glass grinder, around $50, to grind out the chips on the inside of the glass. No matter how good of a glass blade you have you are going to have some chips. We purchased a 600 grit bit and it seems to smooth the inside edges great. Now you are ready to sand!
4. Sanding the edges
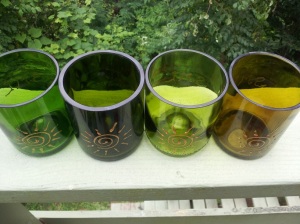
We use sheets of wet dry sand paper. Grits from 100 to 600 seem to work fine (100, 220, 400 & 600). This takes a lot of elbow grease but I get the rims to look and feel really smooth. The edges are not going to be really shiny like in a store but these are hand-made by you! I have been wanting to buy a wet belt sander but can not justify the cost. They are around $500 for the cheaper ones that I would want to buy. Just think of it this way, you are using your own energy instead of electrical and helping save the planet while you get a little exercise.
Like I said in the beginning, there are lots of ways to cut bottles. We have found this by far to be the easiest for us. We make a lot fewer mistakes, if we take our time, than with any other way we have tried. You can spend a lot of money and get some good equipment if you really want to start producing. So far we have bought a new blade ($50) for our old tile saw, a stain glass grinder ($50), sandpaper, paints or etching stuff for the decoration (if you want it). Really not a lot of investment and it is a lot of fun!
Here are a couple of videos that show the cutting and the grinding of the inside edges…..Hope this has helped and happy cutting! Thanks for checking out my blog and helping save the planet one bottle at a time. Would you please like my page on


Great site about cutting bottles. Is your saw a rigid 4020? Can you tell me about the special guide I see in the picture but not in the video? You mentioned that your table saw will not cut bottles length wise. I’ve tried to locate one with a larger diameter saw blade but no luck. Looked into using one of the glass cutting band saws but very small tables and no guides.
Yes it is a rigid 4020. We did buy a blade made for just cutting glass. The guide in the photo is the one that came with the saw. Sometimes we take the guide off and use a block of wood now. If you wanted to cut lengthwise you would definitely need a larger blade and we haven’t committed to that yet….maybe one day. Let me know if you do and how it goes.
Thanks for the quick reply. It sure looks like it to me that the guide in the picture with the c clamp is different than in the video. I would think that the 4020 could be jerry rigged to cut bottles length wise by reworking the blade cover to allow the bottle to pass the blade.
He has a vice holding the level in place. It was moving a little. Since the photo we have corrected that problem.
I guess you could take the blade cover off but the blade is still not tall enough to go through entire bottle. If ur really good guess you could flip bottle over but haven’t tried that yet.
Are you able to cut rings with this method, or just take the bottom off?
Yes. Make sure cut is even and continue same method up the bottle. Check out my gallery on my website. Lots of circles.
Thanks!
I came across this page by accident, but I wanted to say how awesome your repurposed designs and art are. I was looking through the gallery and was very intrigued &impressed with the sushi plates and olive tray that you melted. I was curious as to what kind of kiln or equipment you use & what the investment was and/or where to look for such equipment etc. Also, does the kiln just a ton of energy or is it minimal ?
Your time and resoonse is greatly appreciated!!
** also does the kiln use a ton of energy or is it minimal (DYAC)
I have an Olympic kiln I bought new for $1600. I’m sure you can find them cheaper used but this was my biggest expense. It runs on 220 volt so it does take more energy than a 120 volt kiln which you can find but it will be smaller. I use a mold to make those dishes and run the kiln to around 1400 degrees. Enough for slumping. Thanks for you interest and good luck.
I have been making glasses from wine bottles for 50 years and my entire mechanical cost ($35 +/-) has been tied up in a Sears belt sander and the wet/dry belts I use to bevel the edges of glasses. A long time back I developed a proprietary method of cutting bottles, after building a jig to score the bottles. Cutting a bottle takes less than 30 seonds. Cuts are good.
That is great! I can cut pretty fast with my tile saw. Thanks
Have you tried cutting crystal bottles with a tile saw? Or has anyone else?
I’ve never cut crystal but I think it should work.
What about bottles that aren’t round? I have one with ridges on it and another that is square. Would the cutting be the same?
No it’s not the same. We cut the corners of square bottles first. Then slowly push each corner through the saw. Same thing if it has more than 4 sides. Hope this helps!
I discovered that orange oil works miracles removing labels, and avoids the stinky Goof-off. Pull off as much of the label as easily comes of by pulling or with a scraper. Then moisten the remaining portions of the label. Finally pour a little orange oil on a rag or directly on the label, and you will be able to gently rub the label off. And it smells wonderful!
Thanks!